don't call me becky

Jaftex Blog Hop: Harvest Spectrum Quilt & Fat Quarter Bundle Giveaway

Wednesday, September 23, 2015

Harvest Spectrum Quilt 

 Today's my stop on the Jaftex 85th Anniversary Blog Hop. Jaftex abrics sent me a gorgeous bundle of 20  Studioe Peppered Cottons to use to create a project of my choosing. I love the saturated colors in this line and designed a quilt that uses about a fat eighth of all twenty colors in the bundle.

  Harvest Spectrum Quilt 

To create this quilt, I first cut out strips of fabric that were 8" wide. Then I cut the strips into pieces that were 2.5", 3.5" and 5" tall. I arranged the fabrics in a gradient and then altered each column of fabric to make a pixelated design. The finished quilt measures around 54" x 56".


Harvest Spectrum Quilt 

I quilted vertical organic lines to create movement in the quilt. Combined with the fabric's hand, this quilt has such a great texture.


As a special bonus, I'm giving away a bundle of 20 fat quarters - one of each of the colors featured in my quilt as seen in the photo above. Please leave a comment to be entered into the drawing. I will choose a winner at random on Sunday, September 27. I will ship anywhere in the world, so feel free to enter even if you are not in the U.S.A.

UPDATE: Congrats to commenter number 7, Dudette! I will contact you to arrange for shipping.


Be sure to enter the Grand Prize Giveaway, too!

Harvest Spectrum Quilt

Jaftex 85th Anniversary Blog Hop!

Wednesday, September 2, 2015

This month I'm participating in my first ever blog hop. Jaftex, parent company of Henry Glass & Co., Studioe Fabrics and Blank Quilting, approached me about making a quilt with Peppered Cottons and I happily agreed. I'll be back later this month with the quilt that I created and a fun giveaway.


September 1 – Kim Diehl guest posting @American Patchwork & Quilting
September 2 – Pepper @Pepper at the Quilt Studio
September 3 –Anjeanette @Anjeanette Klinder
September 4 – Leanne @ The Whole Country Caboodle
September 5 –Mark atMark Lipinski’s Blog
September 6 – Heather atHeather Kojan Quilts
September 7 –Heather atTrends and Traditions
September 7 – Martha @ Wagons West Designs
September 8 – Linda @ Linda Lum DeBono
September 9 – Heidi @ Red Letter Quilts
September 10 – Jill @ Jillily Studios
September 10 – Dana @ My Lazy Daisy
September 11 – Penny @ Sew Simple Designs
September 12 – Ida @ Cowtown Quilts
September 13 – Liz and Beth @ Lizzie B Cre8ive
September 14 – Melissa @ Sew Bitter Sweet Designs
September 15 – Yvonne @ Quilting Jetgirl
September 16 – Amy @ Kati Cupcake
September 16 – Barbara @ QuiltSoup2
September 17 – Erica @ Kitchen Table Quilting
September 18 – Leona @ Leona’s Quilting Adventure
September 19 – Margot @ The Pattern Basket
September 20 – Sylvia @ Flying Parrot Quilts
September 21 – Lorna @ Sew Fresh Quilts
September 22 – Kim @ Aurifil Threads
September 23 – Rebekah @ Don’t Call Me Becky
September 24 – Julie @ The Crafty Quilter
September 25 – Mary Ellen @ Little Quilts
September 25 – Mary Jane @ Holly Hill Designs
September 26 – Daisy @ Ants to Sugar
September 27 – Melissa @ Happy Quilting
September 28 – Janet @ One S1ster
September 29 –Jenny atMartingale& Co.
September 30 –Teresa atThird Floor Quilts

Along with prizes offered on each blog stop, there will also be some incredible prizes offered as a grand prize!!!!  You can read all about those prizes and enter to win them at the Henry Glass Fabric Blog Here.

January Quilt for Sarah: Blogger's Quilt Festival

Sunday, May 17, 2015

January Quilt made by Rebekah at dontcallmebecky.com

As soon as I saw Liz Harvatine’s January Quilt block pattern, I knew I had to make my own version. Her designs are always so interesting and her piecing skills leave me in awe and wondering how exactly she puts everything together.

I made this quilt at the beginning of April for Sarah's birthday. Both she and Liz have been such an inspiration to me over the years and I knew I wanted to use a special pattern for Sarah's quilt. This quilt probably has over 100 different fabrics in it; I used all of Sarah's favorite colors--blue, green, orange, and red. One common bond we share is our love for cute fabric and, of course, shopping for said fabric. One bond we don't share is my love of purple!

January Quilt on the Gracie Frame


January Quilt made by Rebekah at dontcallmebecky.com

For the back of the quilt, I pieced random strips of fabrics together to form a colorful mosaic. I'm on a fabric fast until the beginning of August and didn't have matching yardage for the backing.

January Quilt on the Gracie Frame

I quilted this on my new Gracie Queen frame that's set up with my Brother Nouvelle 1500s. It was so much fun to quilt and a lot easier to maneuver everything around on the frame. I have a queue of quilts that are ready to be quilted and just need to find some time to tackle my unfinished projects!

January Quilt on the Gracie Frame

In the past couple of years, I've become obsessed with curved piecing. Curves break up the monotony of chain piecing for me and allow me to try out lots of fun new patterns. Some curved quilts I’ve made so far are: 

If you’re looking to sew with curves, I highly recommend Angela Pingell’s book, A Quilter's Mixology. It’s filled with beautiful patterns and helpful techniques. One new tool I found at Quilt Con is the Bloc Loc Drunkard’s Path ruler set. This is a three piece set with two acrylic cutting templates and one acrylic piece to use to square up your block. The square-up piece has a curved groove the size of your seam allowance, so it locks your block in place for cutting (hence the name!). One of my next quilts will definitely be a drunkard’s path design!


The biggest tip I can share for piecing curves is to place the convex piece face up on the bottom and then concave piece face down on the top. Then slowly stretch and curve the concave piece to fit the convex piece as you sew the quarter inch seam. Having a ¼” foot with a right side guide is helpful to make sure that you’re maintaining a ¼” seam  throughout and it gives something for the curved seam to line up against as you sew.


Secret Swaps

Monday, April 13, 2015

Organized stash 

Last fall, I participated in two different mini quilt swaps. The first was our guild's popular "Super Stalker Mini Quilt Swap" in which each member draws a name and then has two months to make a quilt that would fit their partner's interests and tastes.

Rainbow Fabric Pull

I drew Hayley's name. We are both book and rainbow nerds, so I pulled together a collection of rainbow prints and coordinating peppered cotton solids to make a rainbow bookshelf quilt for her.

Mini bookshelf

Hayley and I just so happened to draw each other's names in the swap and she made me the most beautiful Celestial Star mini.


The second swap was the Quiltcast Podcast Mini Star Quilt Swap.  I was very stumped as to what to make my partner. She listed minimal information about her interests and had no online presence (blog, pinterest, instagram, etc.). If I ever join another online swap, I will make sure that the requirements involve at least making an inspiration board of 3-5 images. It's so tough for a planner like me to know what to do without a particular style or direction from which to work!

My partner listed her favorite color combination as orange, aqua, and teal, so I took those three colors and made a paper-pieced star. I used Elizabeth Dackson's Lucky Stars Block of the Month paper-pieced star collection for this. I saw her finished mini quilt for November, the Arcadian Star, and copied some of her free motion quilting techniques on my star.

Arcadian Star

Arcadian Star

My partner, Monica, sent me the nicest double-sided mini! Her paper piecing is so impressive and I just love the organic lines she used for quilting. She also included some embroidery floss to feed my cross stitch addiction and two sweet mini charm packs.


I've hung both quilts in my sewing room and it's so fun to see beautiful inspiration around me as I sew (or just stare at my pretty collections of things, if I'm being honest with myself!)
  Updated Craft Room

A quilt for my mom

Wednesday, April 8, 2015

Liberty of London Orange Peel Applique - www.dontcallmebecky.com

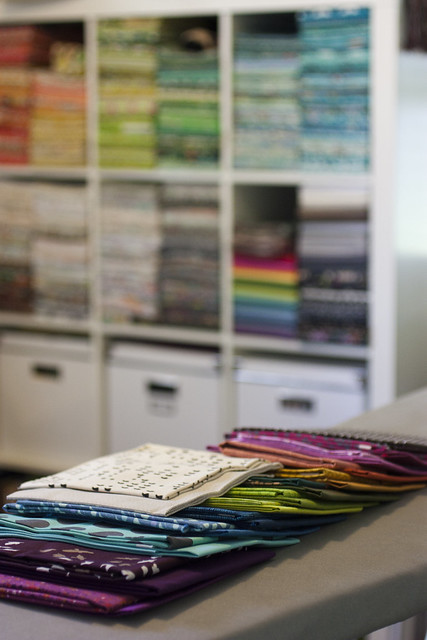
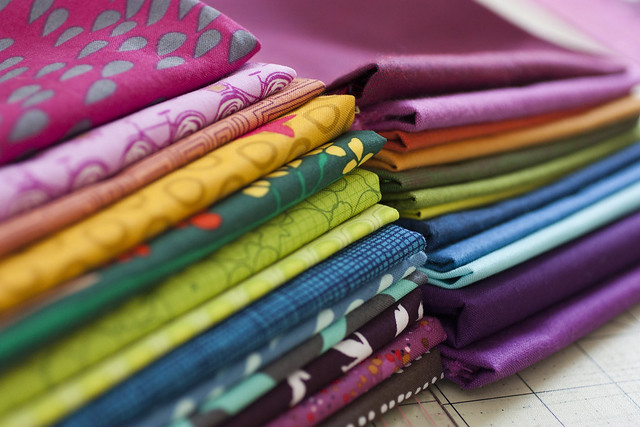
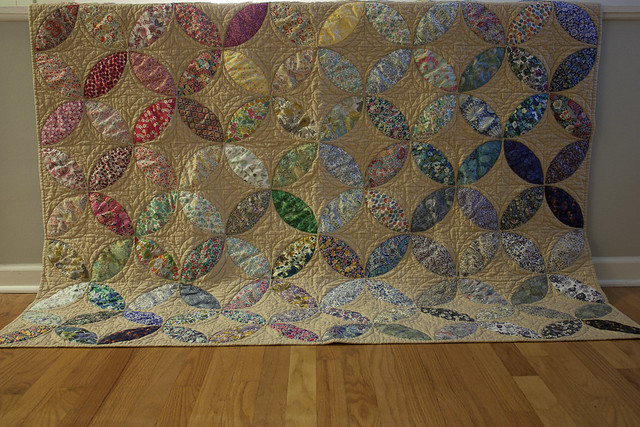
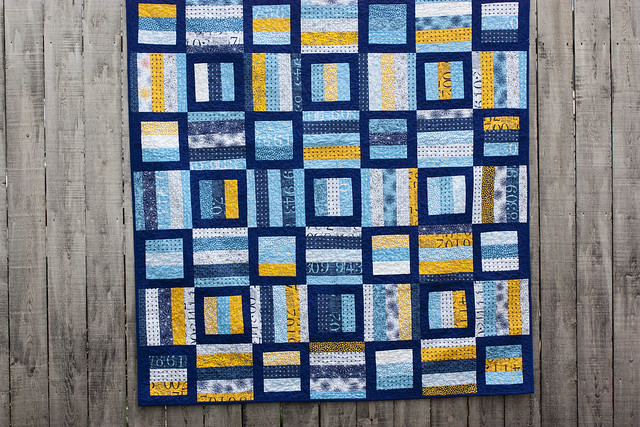
Last year, I began stockpiling Liberty of London fat eighths and sixteenths from Queen Bee Fabrics and the Westwood Acres Liberty club with the hopes of combining them all into a floral patchwork quilt for my mom.

Liberty of London Orange Peel Applique - www.dontcallmebecky.com 

At first I settled on a checkerboard patchwork quilt like this from Red Pepper Quilts. Then I changed course and decided to make an orange peel applique quilt using the Orange You Glad tutorial from Crazy Old Ladies.

Liberty of London Orange Peel Applique - www.dontcallmebecky.com

Here's my thought process while making the quilt:
Cutting and piecing the orange peels: This is so fun. I should only make orange peel quilts from now on.
Turning the orange peels inside out: This is going to take forever. It's a good thing I've got lots of TV shows to catch up on. Thank goodness for that purple thang
Fusing the orange peels to the background fabric: These are coming together so fast. This thing is almost finished.
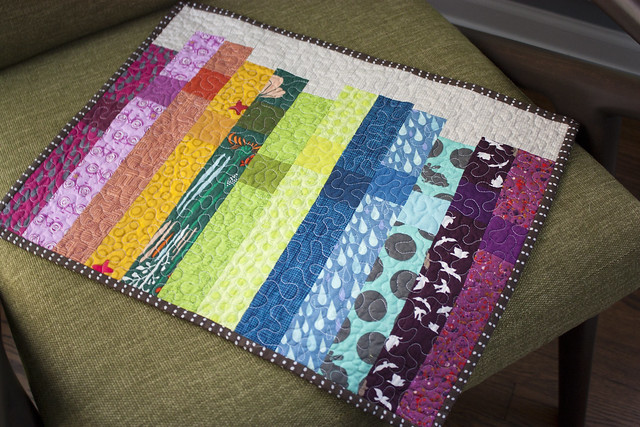
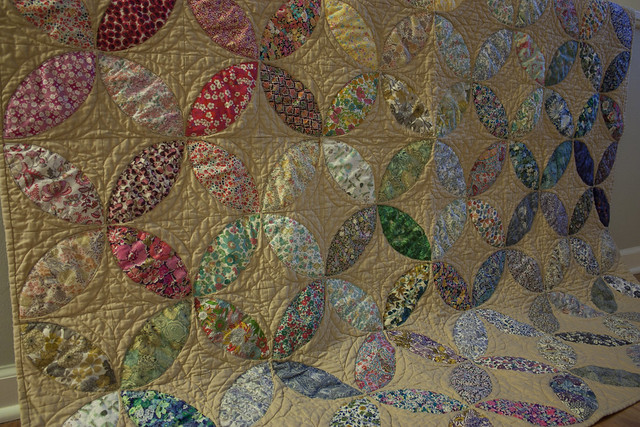
Deciding to lay out the quilt in a rainbow gradient: Love this. Now I want to make one for myself. I should have bought two of everything.
Basting the quilt: So close to finishing!
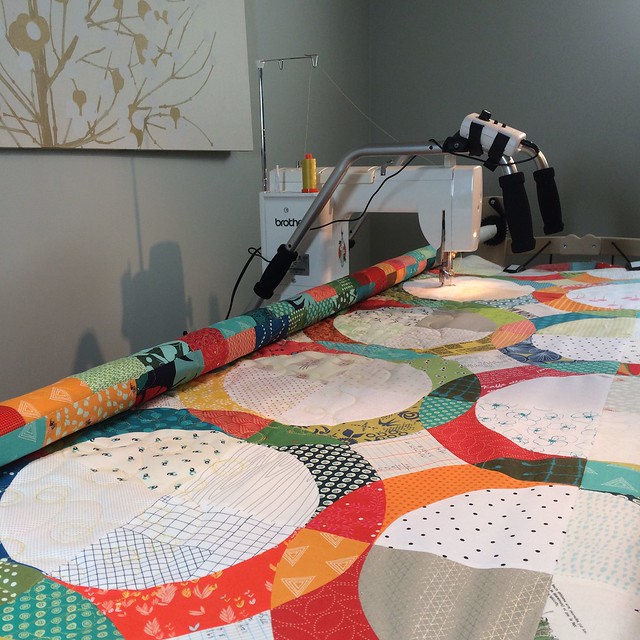
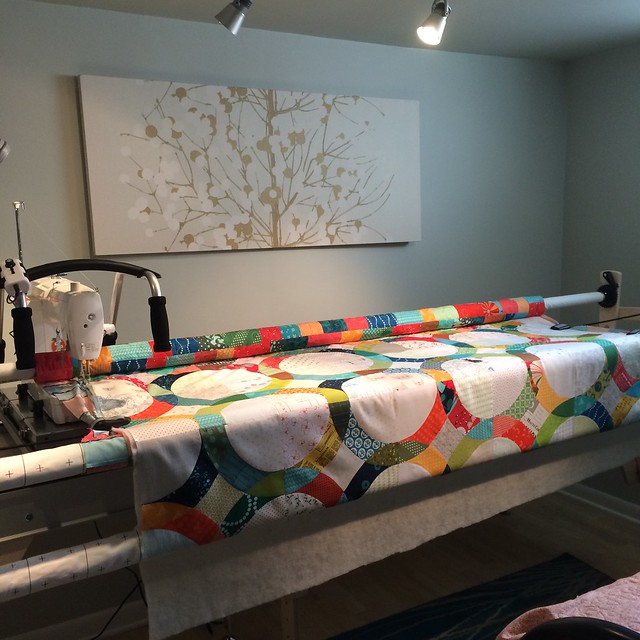
Quilting the top: Yep, that free motion foot is not going to work for outlining these curves. I guess I'll have to use my walking foot.
4 hours later: This walking foot is going to take forever
4 hours later: I don't think I can do this anymore
4 hours later: I'm almost halfway done...
Days later after sewing the peels: Finally, finally, finally ready to free motion quilt the rest!

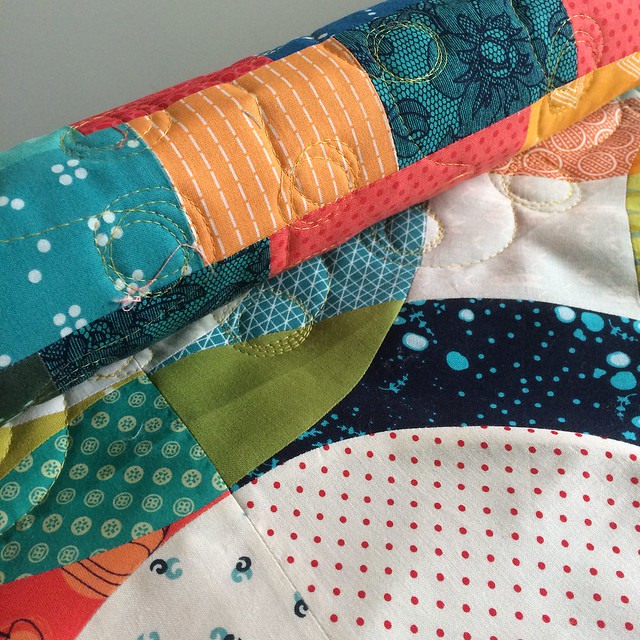
Needless to say, sewing down each of these petals with my walking foot and maneuvering the quilt in a full circle around each of the peels was the worst and most time consuming part of this whole quilt. Luckily, the quilting outlines on the back make up for the hours and hours of turning this quilt around. I have a new found respect for quilters who tackle spiraling circle quilting and know that it's definitely not for me!

Liberty of London Orange Peel Applique - www.dontcallmebecky.com

I credit my mom with teaching me how to sew and instilling a love of crafting in me, so it's only right that such a special goes to her. After all, the first quilt I made her back in 2006 was a tiny crib-sized quilt. And it's only fitting that I finally got around to blogging this quilt on her birthday (Happy Birthday, Mom!)

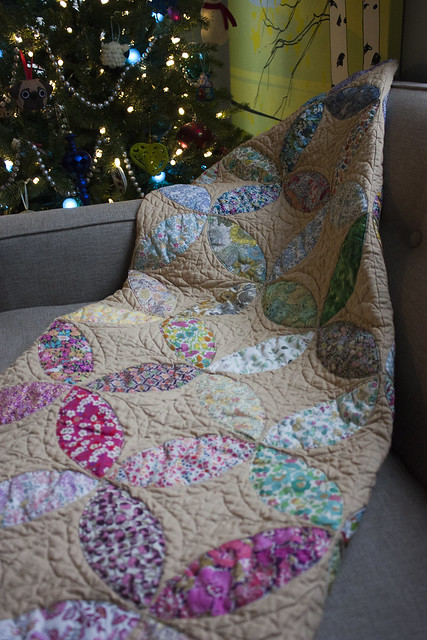
The quilt now lives draped on the foot of her bed as a reminder to me that I should probably have made my parents a queen-sized quilt to cover their entire bed. One of these days...one of these days. Her kitty, Charlie, is pleased with it nonetheless!
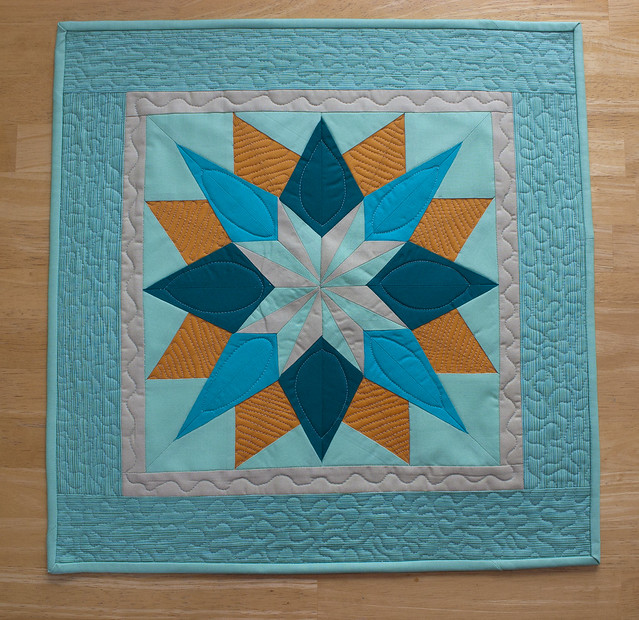
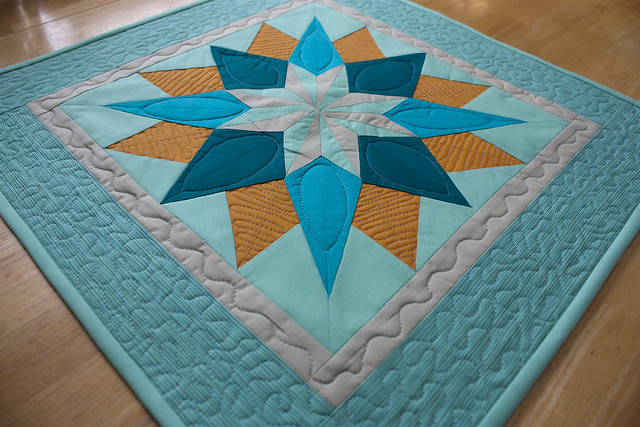
Quilt Details
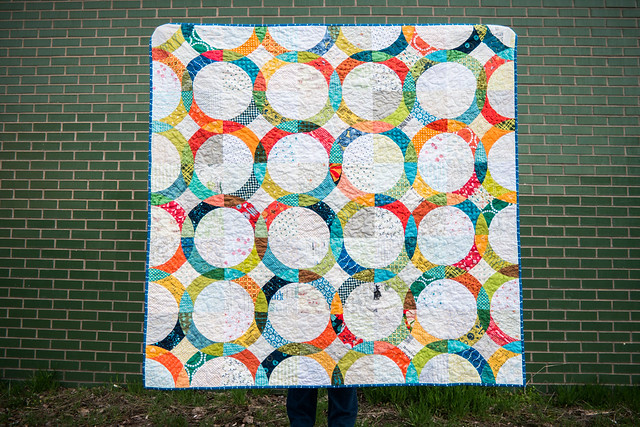
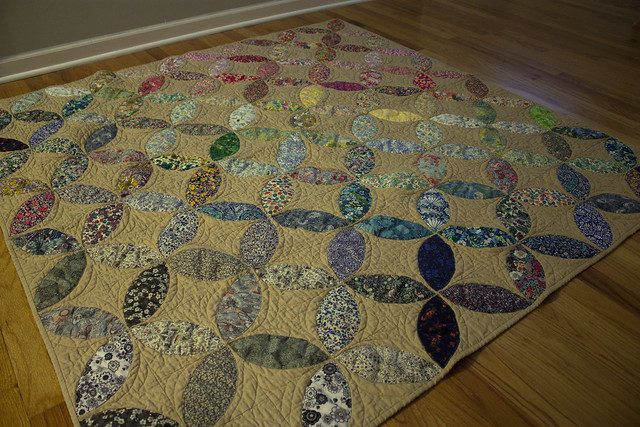
Size: 60"x60" - 144 petals in a 12x12 layout
Background fabric: Kona Biscuit
Quilting: Curved line with a walking foot and center echoes with a free motion foot
Started and finished in December 2014

Liberty of London Orange Peel Applique - www.dontcallmebecky.com

sewing room update & a new machine!

Tuesday, April 7, 2015

Updated Craft Room

I’d always dreamed of having a design wall and a counter-height cutting table in the future sewing room of my dreams because I couldn’t figure out how to add them to my current space. After brainstorming for a bit, I came up with a plan that would give me space for a design wall, fabric storage, and a counter sewing and cutting/pressing. In true Rebekah fashion, as Jon says, I came up with this plan on a Thursday and had it all in place and reorganized by Saturday night. Never resting until being fully content is a bit of a problem for me, but it does manifest itself in productivity and finished projects! 

I've had a couple weeks to sew and use my new space and I couldn't be happier with the setup. I was even able to fit an extra temporary table in here so my neighbor, Christina, and I could sew together.


Here’s a few older tours of my room (2010, 2014). I’ve had the same furniture in place for 8 years, but have added craft supplies and moved things around a bit every so often. This time, I moved out my beloved 4x4 Expedit shelf and my long work table in favor of a more flexible layout. This room is small, at about 9 feet by 12 feet, and it’s made even smaller because the door is diagonal and cuts out a bit of space on two walls.


Updated Craft Room

To the left of the door, I placed my new design wall, following Elizabeth Hartman’s design wall tutorial. I ran into a few roadblocks with this. Because I thought my room was 9 feet wide, I assumed that two four feet panels would fit side by side. Unfortunately, the diagonal door chopped off the width a bit so I had to cut off one foot of width from one of the panels. Then, because the two twin batting pieces that I had were only 90” long, I didn’t have enough length of batting to wrap around the full height of the foam, so I cut off a foot from each panel. Now I have two panels that, when stood next to each other, are 7 feet wide and 7 feet high. It's been so nice to have a dog and cat free area to place blocks while the layout and design percolates.


Updated Craft Room

On the next wall, I added another thin Billy shelf and moved all of my fabric and a majority of books to this spot. I pulled the mini green dresser out of my closet to place under the window. It holds office supplies and cross stitch supplies. 


Updated Craft Room

Next up is my glorious new cutting station. Jon and I built this after seeing a few tutorials on IKEA hackers. I used 6” Capita legs for the base (8 in total), then two pieces of hard oak plywood that’s ¾” thick. In between the plywood, there’s three 2x2 Kallax units. Because the Kallax units are updated, thinner versions of the old Expedit shelves, the width of one unit is not the same as the depth of two units put together, so there’s a 1.5” gap on one side of the end shelf. It doesn’t bother me enough to do something about it, but it is a bit annoying. I used a base of 41”x46.5” and a top of 36”x48”, which fits everything well. On top of table, I’m storing my cutting mat and a pressing board that I made following this tutorial. The wall holds my collection of minis from previous doll quilt swaps, guild swaps, and mug rug swaps.


 Updated Craft Room

I organized my closet and got rid of some older tools, supplies and magazines that I no longer plan on using. I added a Gorm shelf to hold the rest and added a few more of these Trofast bins (suggested by Rossie) for holding works in progress. The large metal bin in there holds lots of mini projects and embroidery kits that are all cut out and ready to go. Hopefully these will be finished by the end of the year.


Updated Craft Room

The final wall holds my favorite tools. The old IKEA table I was using was made from separate legs and a base and wasn’t the sturdiest of tables. This table is a little deeper to hold my new sewing machine and does not vibrate at all while I’m sewing. On the new pegboard, I now have a spot for all of my templates and tools. I love sewing gadgets and I love seeing things hung up in front of me to remind me of what I do own, so this is perfect for that.


And speaking of new machines, I bought this Janome Memory Craft 8900 right after Quiltcon at a fantastically low show special from SewVacDirect. I’ve had it for over a month and have already made one quilt from start to finish and four new tops on it. I couldn’t be happier with my choice and feel like I’ve barely scratched the surface of what this can do. I was not expecting to come home with a new machine right after Quiltcon, but I sewed on it for a bit during the last hour of Quiltcon and couldn’t let it go.

Radio Way Quilt

Monday, March 9, 2015

Radio Way Quilt from Jaybird Quilts - www.dontcallmebecky.com

My dad is a professional night time TV napper who lives in a chilly house. Naturally, his 60th birthday was the perfect excuse to make him a quilt. 

I used two jelly rolls from the Zen Chic Figures line, which were purchased at my favorite quilt shop, Stitched Studio Grand Rapids. I found a contrasting solid for the block borders. For someone who really enjoys picking out coordinating fabrics, this was a bit anticlimactic for me. Jelly rolls, while great time savers, just aren't my thing.

  Radio Way Quilt from Jaybird Quilts - www.dontcallmebecky.com

Radio Way Quilt from Jaybird Quilts - www.dontcallmebecky.com

Radio Way Quilt from Jaybird Quilts - www.dontcallmebecky.com

Size: 63"x81"
Quilting: free motion meandering stipple with grey thread
Finished: November 2014

Blogger Template created by Just Blog It