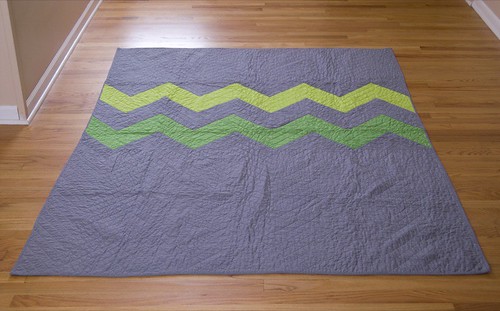
Here's the final Christmas gift that I made...a quilt for Jon. The extra special thing about this was that he had no idea that I had this project in the works. I rushed home from work every day for a few weeks to put in a quilting hours before Jon arrived home from work. Jon was totally surprised and didn't even remember that he had picked this pattern out earlier last year and had requested that I make one to match his office's green/grey scheme.
I used the Big Zig quilt pattern from Denyse Schmidt Quilts and solid Kona cotton fabric for the quilt. I did a little bit of tweaking to the size of the quilt. When I bought the fabric back in September, I had written out detailed notes and adjustments for the final size which included shrinking down the triangles to be more proportionate to the overall size (we're talking trig here) and turning the full sized quilt into a twin sized quilt. Because I threw out my notes months ago (did I mention I'm more of a purger than a packrat?), I just had to wing it for the final size and ended up using the original triangle sizes in the book and chopping off half of a triangle on the right side (oh, well). The final size of this quilt is 62" x 78" and works great as a lap quilt.

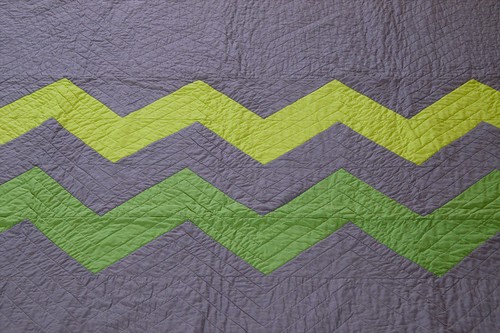
This was my first time quilting with triangles and it took a few passes and a lot of seam ripping before I figured out how to line up the pieces for sewing. I wasn't staggering the pieces enough to make sure that the points weren't cut off at first, but I was able to figure it out after a few tries.
For the quilting, I used a fabric marker to mark the zig zag lines and then traced along on my sewing machine with white thread. I love the parallel zig zags on this and think it's a perfect way to accent the two main zig zags. Denyse Schmidt is a genius!
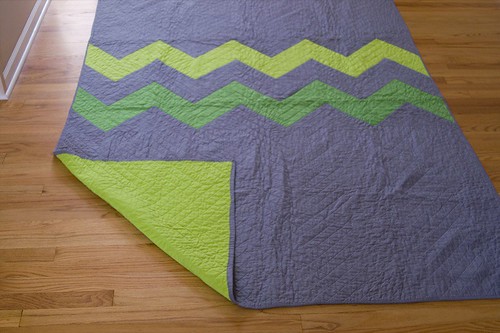
I used the machine sew the front/hand sew the back of the binding method that I used on my last quilt and I think I'm officially preferring this method over the bias tape method. The only snafu that I ran into was that I used Polyester thread (hey, it was on sale) instead of cotton thread to attach the back of the binding, so it didn't shrink at the same rate as the rest of the cotton components. Now the stitches on the back are a bit more defined. But this is definitely something that only I would notice.
i wish i had the guts to figure out how to make a quilt - it scares me!!! Any recommendations for a good book for a total newbie?
ReplyDeleteVery cute! I love green and purple. I think this year I'm going to try and make a quilt. Wish me luck, I'm not much of a sewer!
ReplyDeleteThis is beautiful! I love the colors!
ReplyDeleteGreat quilt! Very fresh in its simplicity :)
ReplyDeleteI love this! It has an Amish quilt type of simplicity but the design and color combo looks very mod. So cool!
ReplyDeleteThis is beautiful, and the color scheme is awesome. I hadn't really thought much about this quilt, but after seeing yours I think it might be a great one to make for my husband...
ReplyDeleteWonderful work!
I love the simple modern design! And those are great colors. Jon office looks great, too. I really like the wall color.
ReplyDeleteLovely! Of course, Denyse Schmidt is a favorite, but love the colors you used. Perfect for a man, but pleasing to the ladies, too!
ReplyDeleteWow, this turned out fantastic! I'm sure he was super suprised. I love the colors you used. I have seen this book but never really considered that pattern. But after seeing yours I think I will put it on my list of "i'd like to make one day".
ReplyDeleteI really like this quilt. I love the surprise part. Thanks for motivating me to go and quilt something.
ReplyDeleteWow this looks fabulous! The quilting must have taken you forever! I have been doing the bias tape method of binding, but I've been thinking about going back to the machine/hand sew method, but I usually run out of time and patience and go back to the bias tape method!
ReplyDeleteoh this is so industrial, I love it!!
ReplyDeleteI like where you decided to start/end the stripes. The color scheme is great, too!
ReplyDeleteI SO know what you mean about ripping out seams. I just sewed four seams for a Big Zig that I'm making, following the instructions about where to align the points, and I think I did it all wrong. The directions aren't very clear on that part of it. Grrr.